Arches National Park, Utah

Last summer Patrick and I had the opportunity to visit Arches National Park during our out west road trip. Arches National Park is located outside Moab, Utah. We only had about a day and a half in the park but we were able to experience some of the park’s highlights. Here’s my small guide to Arches National Park.

Things to know before visiting ANP

  • Timed Entry Reservation system: Currently ANP requires visitors to have a timed entry reservation pass throughout the months of April-October.
    • Timed entry tickets are required to enter the park between the hours of 7am- 4pm (MDT).
    • The timed entry reservations can be purchased on the ANP park’s website and they cost $2 per vehicle. Note, you’ll need a timed reservation pass for each day you plan to visit the park.
  • Exceptions for the timed entry reservations tickets:
    • If you have a reservation with a campground in the National Park, you can show your campground reservation in place of having a timed entry reservation and enter at any time as long as the dates of the campground reservation match the dates you want to enter the park.
    • You can enter the park before or after the allowed times! If you are unable to get a reservation, you can enter the park before 7am. However, keep in mind if you enter the park this way, once you leave the park you will not be allowed back in during the hours required for a timed entry ticket. Similarly, you may enter the park after required hours (i.e., after 4pm).
  • Fees: It costs $30 per vehicle to enter the park which covers the cost of 7 days. We bought the America the Beautiful pass which is $80 for the year and covers entrance fees for all National Parks. I would highly recommend this if you plan to visit multiple National Parks!
  • Camping: There is only one campground within Arches National Park, Devils Garden Campground. If this is a campground you’d like to stay in, I recommended booking as far in advance as possible.
  • Boondocking; If you’re traveling in a van or a car like us, there are several free camp spots surrounding the national park in Moab, Utah. We used Campendium to search free camp spots or areas to park and sleep with a small fee. Note, majority of these areas are first come first serve rather than reservation based.
  • Heat: The heat in this part of Utah and Arches National Park during the summer months is extreme. There were nights we couldn’t sleep in our car set up or tent. This is worth putting in some research especially if you plan to camp like we attempted to. Surprisingly the hotels in Moab weren’t too pricey and definitely worth booking to have a break from the heat. We booked a night at Scenic Views Inn and Suites Moab and it was incredible!
  • Area. Moab, UT is the closet town to the park. This is where you’ll find restaurants, hotels, and grocery shops.

Things to Do

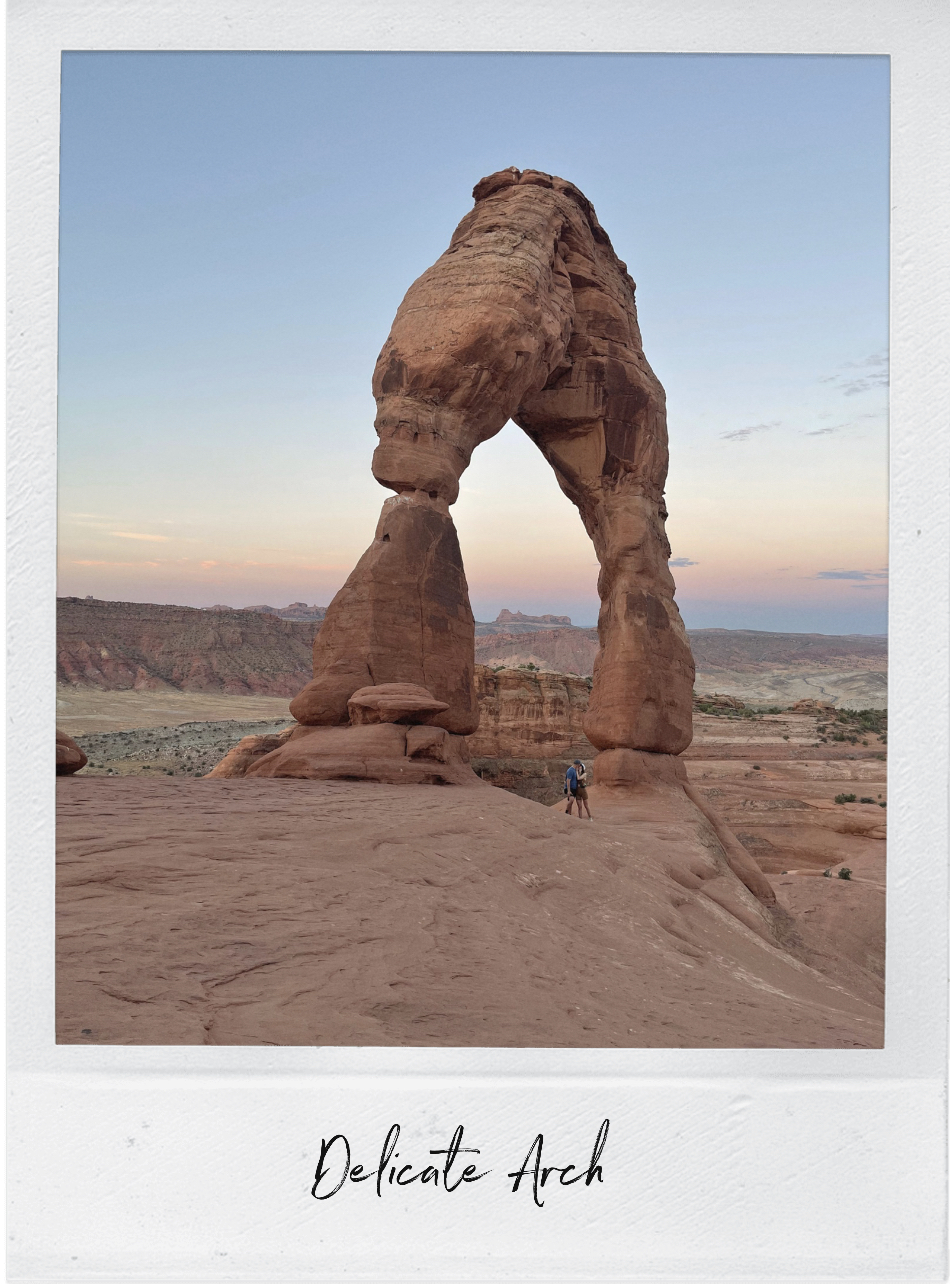
  • Hike to Delicate Arch (park at delicate arch trail head) for sunrise. This was my absolute favorite thing we did while visiting Arches National Park. This arch is one of the most popular so it was well worth it to hike at sunrise and enjoy the views in peace before the crowds!
  • Drive to double arch trailhead and walk to see Double Arch.
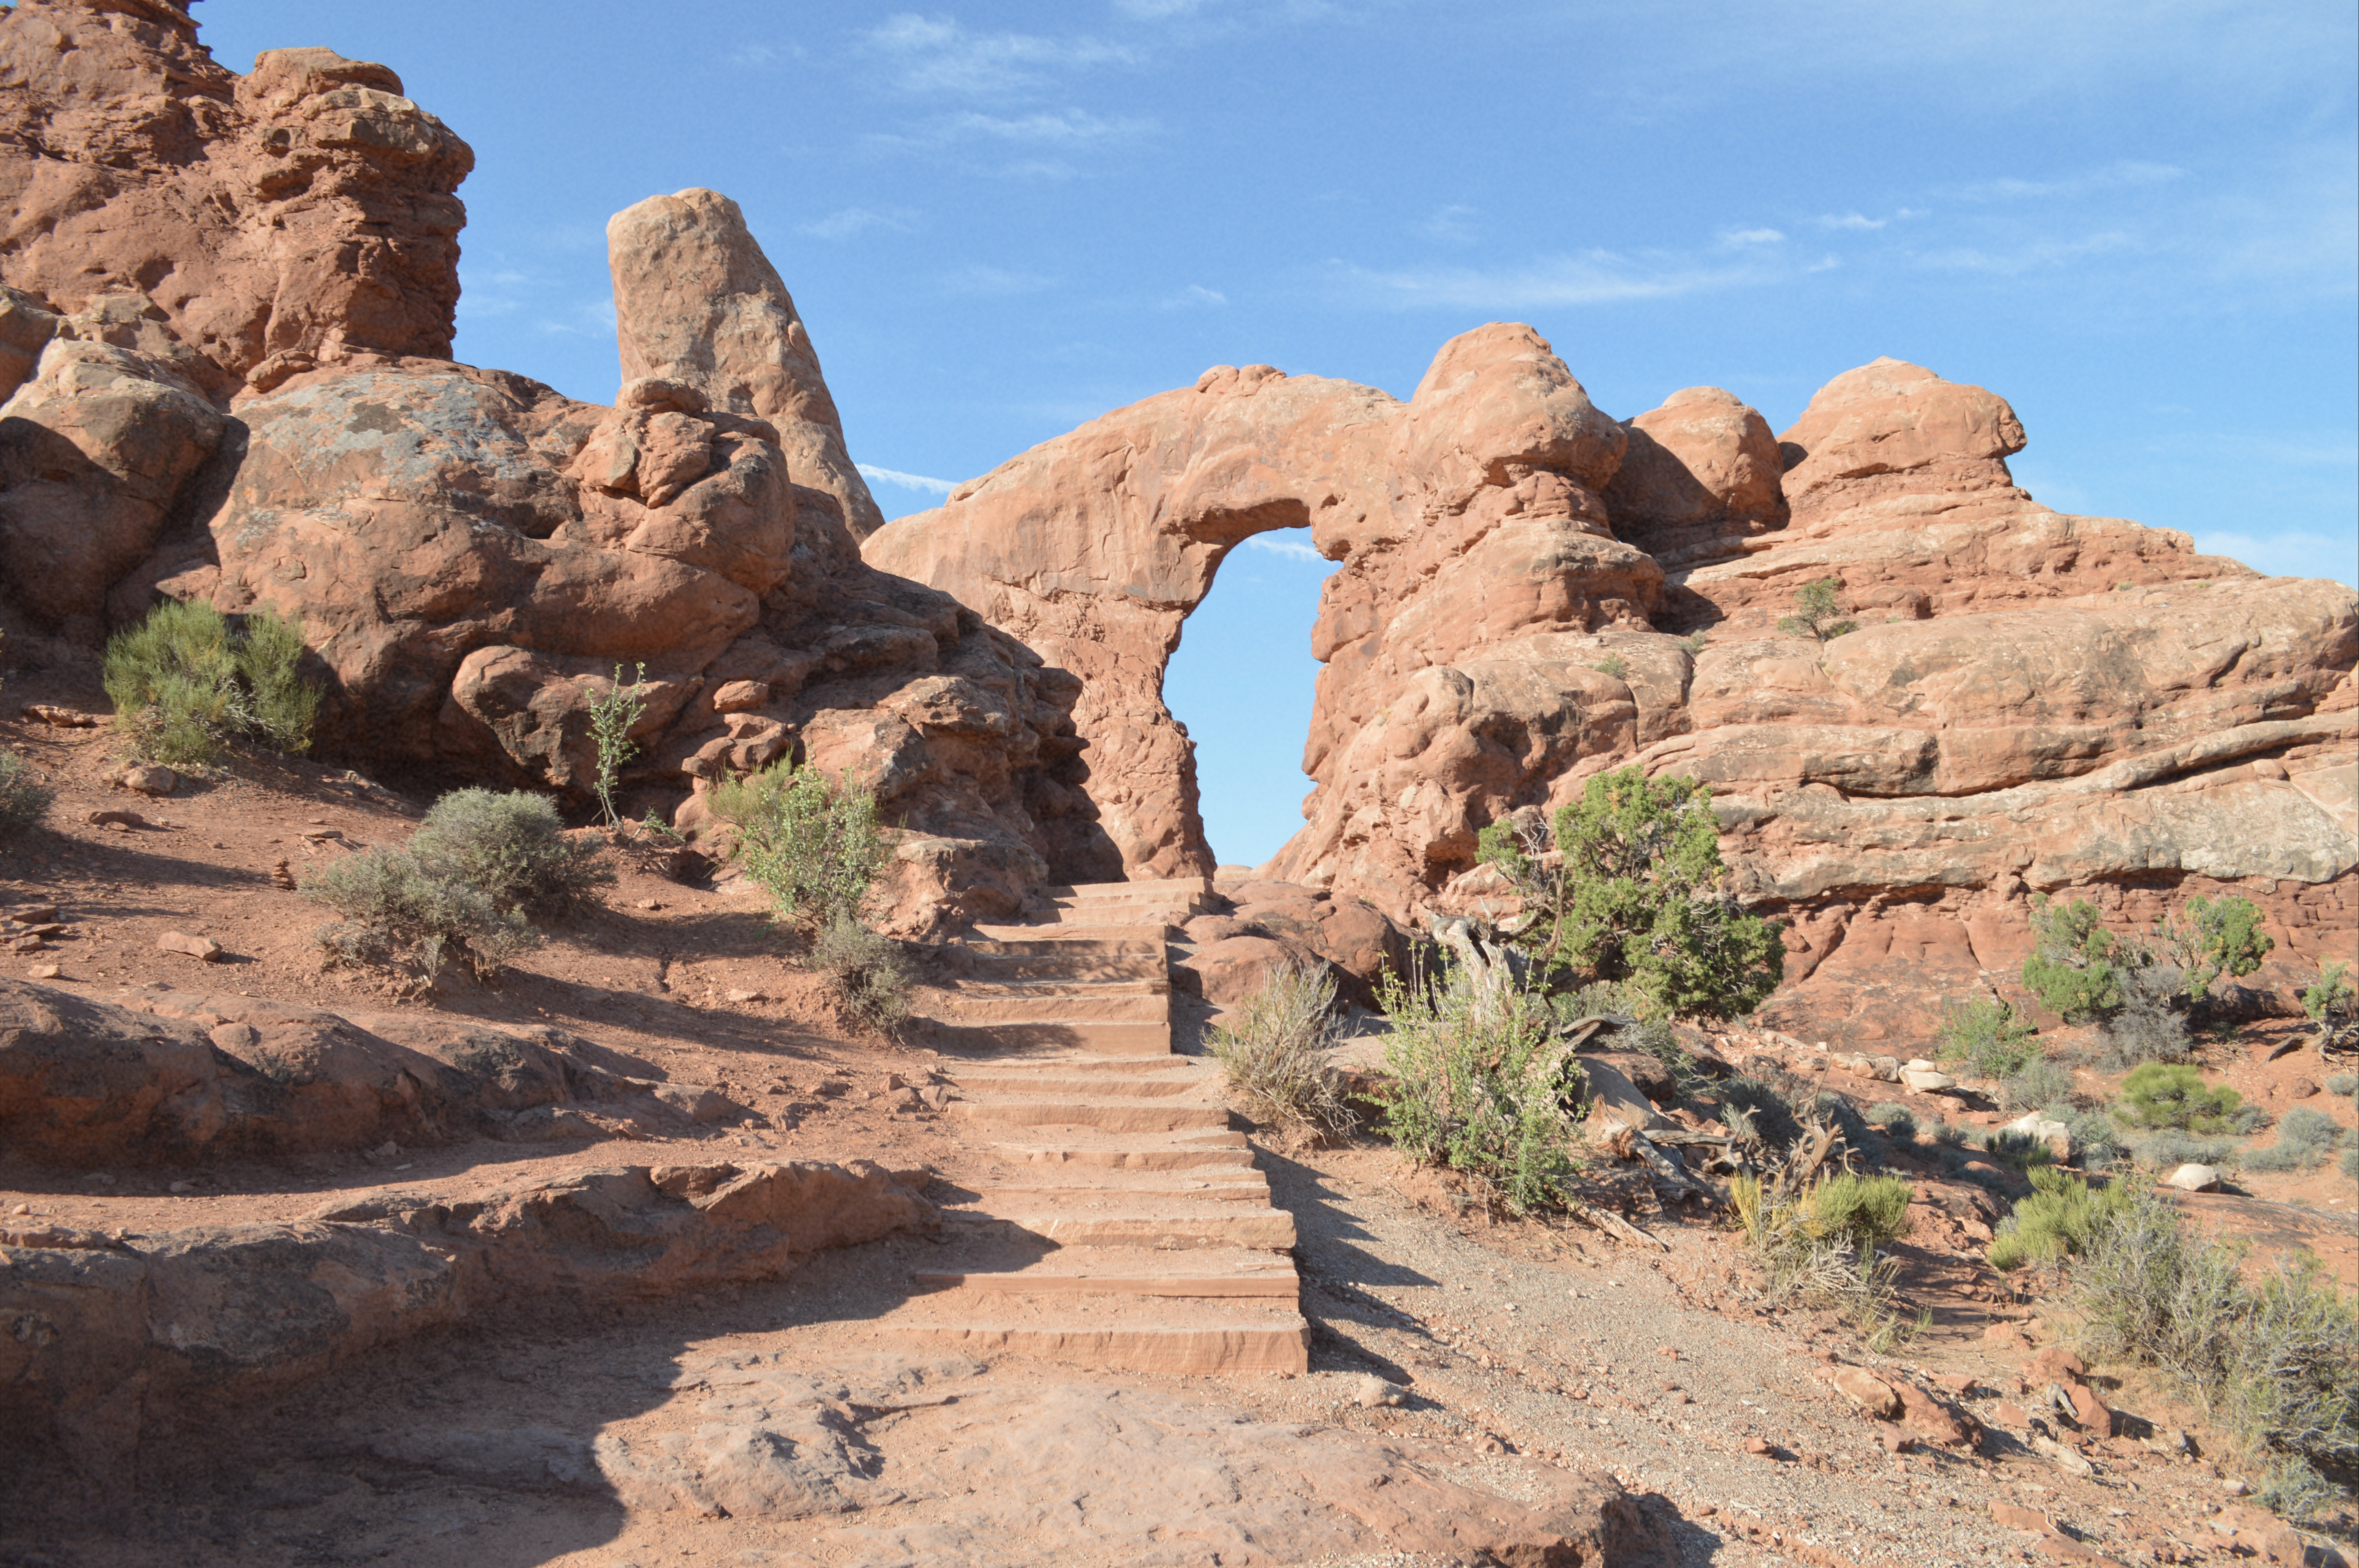
  • Continue walking the loop path to see North Window, South Window, and Turret Arch
  • Drive along scenic drive & stop to see various viewpoints:
    • petrified dunes
    • panorama point
    • fiery furnace/salt valley
  • Stop at visitor’s center
  • Take time to explore Park Avenue

My Tips

  • Start hikes in the dark to catch the sunrise and avoid crowds. We used head lights and our offline All Trails map while hiking in the early morning hours. Arches National Park is a very busy place so hiking early ensures some peace before crowds. We hiked to Delicate Arch before sunrise and it was our favorite experience while visiting the park.
  • Carry plenty of water. As I mentioned, Arches National Park can be extremely hot during the day if you’re visiting during the summer time. Be prepared to continuously hydrate! The visitor’s center has free water you can utilize to fill up water bottles.
Delicate Arch at sunrise
Entrance to Arches NP
Driving through Arches NP
Double Arch
Pit stop for a photo
View of more Arches
Hiking through Arches NP
Park Avenue
Walkway near Park Ave

Rocky Mountains National Park, Colorado

This past summer my boyfriend, Patrick and I took our first big road trip out west. The first stop along our road trip was the beautiful, Colorado. We only spent a few days in Colorado and our main focus was the Rocky Mountains National Park. The park exceeded our expectations! We are dreaming of our next trip to RMMP! We had about two full days in the park which was a decent amount of time for a quick visit. I would recommend at least 3-4 days in the park to enjoy several activities and hikes. Throughout this guide I’ll be sharing our experience in the Rocky Mountains National Park.

Things to know before visiting RMNP 🌲

  • Timed Entry Reservation system: Currently RMNP requires visitors to have a timed entry reservation pass throughout the months of May-October. There are two types of timed entry reservations:
    • The Bear Lake Road Corridor [required during the hours of 5am-6pm (MDT)]. This pass will give you access to the entire park as well. I would recommend trying to get this pass to experience all parts of the park.
    • Park Access, No Bear Lake Road [required during the hours of 9am-3pm (MDT)]. This reservation allows access to the park but not the bear lake road area.
    • The timed entry reservations can be purchased on the RMNP park’s website and they cost $2 per vehicle. Note, you’ll need a timed reservation pass for each day you plan to visit the park.
    • Exceptions for the timed entry reservations tickets:
      • If you have a reservation with a campground in the National Park, you can show your campground reservation in place of having a timed entry reservation and enter at any time as long as the dates of the campground reservation match the dates you want to enter the park.
      • You can enter the park before or after the allowed times! If you are unable to get a reservation, you can enter the park before 5am/9am depending on the area you want to access. However, keep in mind if you enter the park this way, once you leave the park you will not be allowed back in during the hours required for a timed entry ticket. Similarly, you may enter the park after required hours (i.e., after 6pm or 3pm depending on the area).
  • Afternoon Thunderstorms: The RMNP is known for afternoon thunderstorms especially in the summer time. Keep this in mind when planning hikes and other day activities.
  • Elevation Change: The RMNP has a significant elevation range which can cause altitude sickness without proper time to allow your body to adjust. The only way to treat altitude sickness is to return to lower elevation.
  • Fees: It costs $25 per vehicle to enter the park which covers the cost of 7 days. We bought the America the Beautiful pass which is $80 for the year and covers entrance fees for all National Parks. I would highly recommend this if you plan to visit multiple National Parks!
  • Phone reception: Like many National Parks, there is no cell reception available within the park (including campgrounds!). Keep this in mind if you need to download directions to trails in advance.
  • Accommodations: If you plan to stay at a campground while visiting the park, book early! Campgrounds are available to book 6 months in advance and definitely fill up quickly. I imagine hotels/lodges in the area fill up just as quickly.
  • Area: Estes Park is the closet town/area to the RMNP. In Estes Park you’ll find restaurants, hotels/lodges, and grocery stores.

Things to Do in RMNP:

DAY ONE

Estes Park & Bear Lake Corridor

Overview:

  • Stop at Kind coffee, Estes Park before a full day of hiking
  • Spend the day at Bear lake trailhead:
    • Hike to Bear Lake
    • Hike to Nymph lake
    • Hike to Dream Lake
    • Hike to Emerald Lake (3.2mi one way)
  • Explore Estes Park
  • Check into campground, Glacier Basin

On our first day in the park, we drove in from Boulder, CO which was about an hour drive. Before going into the park we stopped in the park’s closest town, Estes Park. This town is definitely worth exploring either before or after a day in the park! I’d recommend stopping on the way into the park for a cup of coffee and a breakfast sandwich at Kind Coffee before starting a big day of hiking.

After some coffee and breakfast, we spent our first day in RMNP exploring the Bear Lake corridor area. This area features several hikes but we focused on the lake hikes that all connect: Bear Lake, Nymph Lake, Dream Lake, and Emerald Lake. If you hike all the way to Emerald Lake it’s about 3.2 miles. We were only able to hike to Dream Lake and back due to a rain storm that started coming in. And although we missed out on Emerald lake, this hike was still one of my favorites in the park!

After a full afternoon of hiking, we spent our evening exploring more of Estes Park. We then checked into our campground for the next couple nights, Glacier Basin campground. If you’re looking to book a campground, I highly recommend Glacier Basin, it’s great proximity to the park and clean.

DAY TWO

Trail Ridge Road & Mount Ida

The highlights:

  • Drive along Trail Ridge road and catch the sunrise
  • Hike Mount Ida (park in Milner pass parking lot) 9 mi roundtrip
  • Stop at Alpine visitor’s center for souvenirs
  • Enjoy dinner back in Estes Park at The Bird and Jim

We started our second day in RMNP bright and early (4am!) for a drive along the Trail Ridge road on our way to Milner Pass parking lot for a big hike. From this trial head we started our hike to Mount Ida. This hike is strenuous and long but the 360 views make it all worth it! I recommend starting as early as we did to beat any thunderstorms that may roll in during the afternoon hours. This hike was a total of 9mi round trip and took us about 6 hours. Keep in mind this trailhead is on the opposite side of the park, so plan for a lengthy drive. From our campground, we were about an hour away from the trailhead.

My Tips

  • Start hikes early!– Even with the timed reservation system, the RMNP is still very crowded! Starting hikes before 7am ensures the trail to yourself or with only a few others. You’re also more likely to see some amazing wildlife.
  • Carry bear spray!– As a precaution it’s always best to be prepared in case you encounter an aggressive bear.
  • Wear layers– we visited RMNP in August and the mornings and evenings were cold but by the afternoon the sun was strong.
  • Plan in advance– if possible, start planning your trip to RMNP (or any national park) well in advance (6+ months) to ensure you can reserve an overnight accommodation.
  • Leave no trace– only leave footprints and only take photos + memories!

A Weekend in Hocking Hills State Park, Ohio

Last weekend, I booked a surprise trip for my boyfriend Patrick’s birthday. Hocking Hills State Park is a place we both have wanted to visit. I knew booking a cabin for his birthday weekend would be the perfect way to soak up the beauty of the park.

The park is full of beautiful trails, cliffs, and waterfalls. Located in Southeast Ohio, Hocking Hills State park is a special place that feels like a national park at times. Most of the trails are not difficult and several are connected making it easy to see more locations by foot. I would suggest starting the day early to beat some crowds to enjoy the scenery in a more private way.

Tips

  • Wear waterproof footwear- almost all the trails we encountered had waterfalls or streams of water. It was a relief to hike through without worrying about our feet getting wet.
  • Bring plenty of water and snacks- there are a lot of beautifully spots to have an impromptu picnic or lunch while hiking.
  • Plan out stops- there is very little cell service within and around Hocking Hills so it’s best to plan out where to hike first if directions are needed via google maps. At the Old Man’s Cave visitor’s center, they provided maps of the popular trails which was helpful to have along while we were hiking.
  • Bring layers and rain gear- it rained off and on the whole weekend we were visiting and it was so nice to have a rain jacket

Spots to see:

  • Old Man’s Cave
  • Rock House
  • Cedar Falls
  • Ash Cave

Other spots and activities:

  • Hocking Hills winery– you can bring your own food and buy wine for a relaxing night after a day of hiking!
  • Kayaking down the Hocking Hills River- we booked a 5 mile kayak trip to end our time in hocking hills

Favorite Travel Photos 2019

It’s hard to believe 2019 is quickly coming to an end. As I reflect on the past year, I have so many wonderful travel moments to look back on. In 2019 I traveled to ten countries and countless cities in between. 2019 has been one of my favorite travel years yet. This year was special for several reasons, I was able to travel to places that have been at the top of my bucket list. I swam in the Blue Lagoon in Iceland, paraglided over the Swiss Alps, had a picnic underneath the Eiffel Tower, tasted an authentic Belgium waffle and took a Harry Potter walking tour in Edinburgh, Scotland. Of course every place I went this year, my camera was in hand. Being able to reminisce through the photos I collect is something very special to me. So to wrap up 2019, I’m sharing my favorite travel photos from this past year.

Happy New Year everyone!

Processed with VSCO with m5 preset

EF1CAD7D-EC34-48CA-B2F3-B5AFE8BB2D86

eafbdbd1-1115-4db6-93f8-e3e55608f2af

D1087C21-81E8-462C-9D40-4F4C1D7BC292

Processed with VSCO with m5 preset

IMG_9240

photobooth

IMG_9871

IMG_8455.JPG

IMG_9014

IMG_8753

IMG_5983 2

IMG_3401.JPG

style by skye

IMG_5007

IMG_0076 2

Processed with VSCO with m5 preset

IMG_5054

Processed with VSCO with m5 preset

Processed with VSCO with c1 preset

IMG_8828

IMG_6476

IMG_2879.JPG

IMG_1314

Processed with VSCO with g3 preset

IMG_0178

Facetune_24-09-2019-20-16-05.JPG

IMG_3266.JPG

IMG_8846

Processed with VSCO with m5 preset

IMG_3894

Processed with VSCO with g3 preset

IMG_1284.JPG

IMG_2077.JPG

IMG_7852.JPG

8B73A426-2D81-46BD-9529-2A1E345C6069.JPG

IMG_7848.JPG

AF868269-4D95-48FC-88CB-C3910F53EDC4.JPG

IMG_6582.JPG

IMG_7851.JPG

Coffee Guide: Akron & Canton, Ohio

Out of all the wonderful places I’ve traveled to, Ohio will always be special. It’s home. I want to start an ‘Ohio Travel Series’ on my blog and to begin, I’m writing about the best places to get a cup of coffee in my hometown. North East Ohio may not be known for too much, but we do have some great coffee shops worth trying while visiting the area.

Here’s a round up of my favorite spaces, in alphabetical order, for where to get the best coffee in the Akron and Canton area!

Akron Coffee Roasters. Probably my favorite coffee shop in Akron. ACR now has two locations, one in downtown Akron and one in Cuyahoga Falls. I love stopping in for an americano and a slice of their best kept secret: avocado toast!

Angel Falls Coffee Company. A sweet authentic coffee shop located in highland square, Akron. There’s a variety of drinks served here as well as delicious foods, especially their homemade quiches!

Artisan Coffee. Home to some of the best pastries that pair well with a espresso drink. This is also a great stop for meetings or getting some work done, there’s plenty of space inside.

Asterisk Coffee Bar. This is Akron Coffee Roaster’s newest coffee shop, located close by to the original in Cuyahoga Falls. This location is nice because it’s spacious and now serves cocktails and small bites on the weekends!

Heartwood Coffee Roasters. A cozy coffee shop, with a couple locations but my favorite is located in Hudson, just a little north of Akron. Heartwood coffee is known for their irresistible treats and fun seasonal drinks.

The Human Bean. A franchise popular along the West coast has blessed Ohio with it’s amazing coffee! I love the human bean because it’s a drive up coffee place! There’s two drive up sides along the building and multiple cars can drive up and order. Makes it easy to grab a cup of coffee while running errands. The best americano in Canton!

Muggswigz Coffee & Tea Co. A long time Canton favorite located downtown. Muggswigz is a great spot to meet up with friends for coffee and listen to some live music on the weekend nights.

Nervous Dog Coffee Bar. Another great coffee shop with a cozy interior perfect for catching up on work or diving into a book. The Nervous Dog now has a few locations around Akron, my favorite is the original, located on Market street. For any ‘Friends’ fans, the original location resembles what a modern day “Central Perk” would be.

Walkie Talkie Espresso & Coffee. A new coffee shop located in downtown Canton. The interior is welcoming and bright, a great spot to take a break with a cup of joe. I recommend picking up some coffee beans to go here, so great to have at home!


Edinburgh, Scotland

IMG_9729

Edinburgh was an easy city to fall in love with. Every corner was had a unique appeal, from the charming architecture, to the Scottish shops, to the bagpipe players, I knew right away Edinburgh was special. Although I would’ve liked to see more of Scotland’s countryside, Edinburgh was the perfect introduction to the beauty the country offers.

Eats:

* Breakfast/Brunch: Burr & Co, The Milkman

* Lunch: Spoon, Hula Cafe

* Dinner: The Devil’s Advocate

* Sweets: Mary’s Milkbar

* Coffee: Wellington Coffee, The Elephant House

* Harry Potter fix: Magic Potions Tavern

Things to Do:

* Go on a walking tour! Edinburgh offers several walking tours, most are free. If you’re a Harry Potter fan there is a really great free walking tour everyday at 1:30pm.

* Go see the Edinburgh Castle. This is an incredible site in the city and easily visible without purchasing tickets to go inside.

* Hike to the top of Arthur’s Seat. A stunning view of Edinburgh can be seen from this point. The hike itself takes about thirty minutes and it’s just challenging enough but the view from the top is well worth the steep climb.

* If you’re a Harry Potter fan (like me!!) there is a place called the Magic Potions Tavern where you can get a butter beer and Harry Potter treats featured in the books and films.

* Walk along the Royal Mile street. This is a well known street with several Scottish shops and restaurants. It also leads all the way up to the Edinburgh Castle.

* Find Victoria street. This is supposedly the street that inspired J.K. Rowling to create Diagon Alley in the Harry Potter books. It’s a beautiful street with fun shops and colorful store fronts.

Tips & Tricks:

* Edinburgh is a small city and very walkable. When looking for a place to stay, I suggest staying on the Old town. The buildings are so charming on this side and it reveals the Scottish side to the city.

* As I mentioned there are several free walking tours. However, the tour guides still expect tips at the end of the tour since this is their full time job so it’s not entirely free.

* Similar to London, the weather in Edinburgh is unpredictable so pack proper rain gear or always have an umbrella on hand.

IMG_9788.JPG

IMG_9809.JPG

IMG_9871.JPG

IMG_9870.JPG

IMG_9869.JPG

IMG_9790.JPG

IMG_9730.JPG

IMG_9729.JPG

eafbdbd1-1115-4db6-93f8-e3e55608f2af.jpg


Berlin, Germany

IMG_9086.JPG

Berlin, what an intriguing city. Full of more culture, history, rebellion, and weirdness than any other city I’ve ever been to. Berlin was a much bigger city than I imagined and a city that still seem to hold on to all of the intense history it once experienced. With only two days, I made the most with my time. Here’s a small guide to the German capital:

Eats:

Brunch & Coffee: Silo Coffee

Lunch/Dinner: BurgerMeister

Sweet: Aldemir Eis

Things to Do:Β 

* Walk to the East Side Gallery. This is a fun area to spend time around and take pictures with a unique background. The East Side Gallery is the longest part of the Berlin Wall that is still interacted and is now an artistic landmark.

* Visit the Berlin Cathedral. This Cathedral is stunning and there are several different spots to capture a beautiful picture. I suggest finding a cafe along the river to properly view this Cathedral’s beauty.

* Go see the Brandenburg Gate. This is a must see site in Berlin, as it symbolizes Berlin’s history.

* Walk along the Berlin Wall memorial. This memorial shows the last pieces of the Berlin Wall and the grounds that were once behind it. It’s another historical site that must be visited.

* Visit the Holocaust memorial. It’s an indescribable feeling.

* Enjoy a German beer and a pretzel!

Tips & Tricks:Β 

* The metro system seems intimidating at first, but once you take one or two rides it gets easier. It is definitely the cheapest option for transportation around the city and it also saves a lot of walking time.

* There are several restaurants and shops that only accept cash. Luckily, the city is full of ATM’s on almost every corner, but be sure to have cash on hand.

IMG_9240.JPG

IMG_9194.JPG

IMG_9083.JPGIMG_9086.JPGIMG_9095.jpg

IMG_9082.JPG

IMG_9085.JPG

IMG_9230.JPG

A Day in Amsterdam, Netherlands

IMG_8967.JPG

Amsterdam has to be one of the greatest cities I’ve ever visited. It’s a city full of amazing energy, delicious food, and beautiful canals. While I was visiting Brussels I decided to take a three hour train ride up to Amsterdam for the day. There’s a lot to see and do in Amsterdam but if time is limited, a day trip is definitely possible.

Eats:Β 

Brunch & Coffee: Pluk Amsterdam

Stroopwafel: Van Wonderen Stroopwafels

Dutch Pancake: Pancakes Amsterdam

To Do:Β 

* Walk around the city and enjoy the canals. Personally, I think Amsterdam’s canals are prettier than Venice’s and it’s much less crowded. Walking along the canals is the best way to enjoy the incredible energy within the city.

* Take a canal tour! I did this on my first trip to Amsterdam a couple years ago and I still think it’s a great way to enjoy the canals from the water.

* Enjoy the wonderful food. You can’t go to Amsterdam without trying a stroopwafel or a traditional Dutch pancake!

* Visit one of the many museums. I love the Van Gogh museum in Amsterdam, but there are also a couple others such as the Anne Frank house, Rijksmuseum, and the Moco museum. Be sure to purchase tickets online in advance.

* Walk by the Floating Flower market, also called the Bloemenmarkt.

* Rent a bike. I didn’t have time to do this but it’s something I’d love to experience on my next visit.

Tips & Tricks:Β 

* There are several cute cafes throughout the city, not to be confused with a “coffee shop” which sells legal marijuana. During my first visit to the city, I was worried I’d get these two different types confused. Rest assured, a “coffee shop” looks like a bar (also the smell is a big giveaway).

*Dutch pancakes are a bit different than traditional American pancakes. A traditional dutch pancake is big, flat, and thin. They can be made sweet or savory depending on what you’re in the mood for.

* Tickets for museums such as the Van Gogh and Anne Frank are required ahead of time with a specific time slot.

IMG_9008.JPG

IMG_9007.JPG

IMG_9014.JPG

2732BD00-7757-4A0C-9295-47AEDEB79A99.JPG

IMG_9013.JPG

IMG_9010.JPG

IMG_9269.JPG
5CF3E5A2-95D9-4BAB-9BA5-445A9236EE7A.JPG


Brussels, Belgium

Belgium has always been a place in Europe I’ve wanted to visit but never seemed to make it a priority. I recently spent two days in Brussels and I can now say I wish I would’ve visited sooner! Brussels is a small city with stunning architecture, rich history, and amazing food…I could write a whole post based on the food alone. If Brussels has ever been in the back of your mind, I highly suggest visiting!

Eats:

* Waffles: Maison Dandoy

* Frites: Cafe Georgette

* Chocolate: Elisbeth, Le Comptoir de Mathilde

* Brunch/Lunch: Peck 47, The Sister Brussels Cafe

* Dinner: Cafe Georgette

Things to Do:

* Walk around the Grand Place. This square is full of stunning architecture and gold detailing. The Grand Place square is also a great place to sit and eat a waffle or frites and people watch.

* Eat, eat, eat. Brussels is home to the most amazing waffles, frites, and chocolate!

* Take a day trip. Brussels is located close to other parts of Belgium and close enough to Amsterdam for a convenient day trip.

Tips and Tricks

* There are two types of Waffles to pick from: Belgium and Leige. The Belgium waffle is long, fluffy, and crispy. The Leige waffle is thicker, a bit sweeter, and chewier.

* There are several waffle places around the city but after tasting a couple different places, Maison Dandoy was my favorite. There is also the option to add toppings such as whip cream, fruit, chocolate, but the traditional way to eat a waffle in Belgium is plain with just powdered sugar.

* There are a few different train stations in Brussels, so be sure to know where you are staying in relation to the station.

IMG_8777.JPG

IMG_8828.JPG

IMG_8779.JPG

IMG_8778.JPG

IMG_8790.jpg

IMG_8846.JPG

IMG_9027.JPG

IMG_9028.JPG

IMG_9026.JPG